Job definition and scheduling with business day semantics
Maymyo has a Scheduler that works similarly to cron or Windows Scheduler. The difference is our Scheduler will only run our Application Jobs, which has Steps that can be run conditionally. Each Step will execute 1 or more Tasks simultaneously. A later Step cannot start until all the Tasks of an earlier Step has completed. A Task can be either an Application Command or Report which will be submitted to the Task Queue for execution.
To use the Scheduler, you must first define an Application Job. Then create a Scheduled Job that will execute this Job at a specific time, either once or repeatedly. The output of your Job’s tasks will be available using the “View your Tasks” button in your Dashboard. A single Job can have many schedules.
Defining an Application Job
An Application Job can be very simple, comprising 1 Step and 1 Task or very complicated, comprising multiple conditional Steps, each with tens of Tasks. A simple Job can be one where a User wants to run a few reports at 7am every Monday. A complex Job usually performs a lot of batch processing and reports for your application, eg End of Day closings.
Before you create a new Job, you must be clear on what tasks you want to run. You also have to figure out if your tasks has dependencies on each other, ie a certain task can only be run after the completion of another task. You have to split these tasks into different Steps. For example, reports may depend on transactions performed by a batch processing task, so it must be in a later Step.
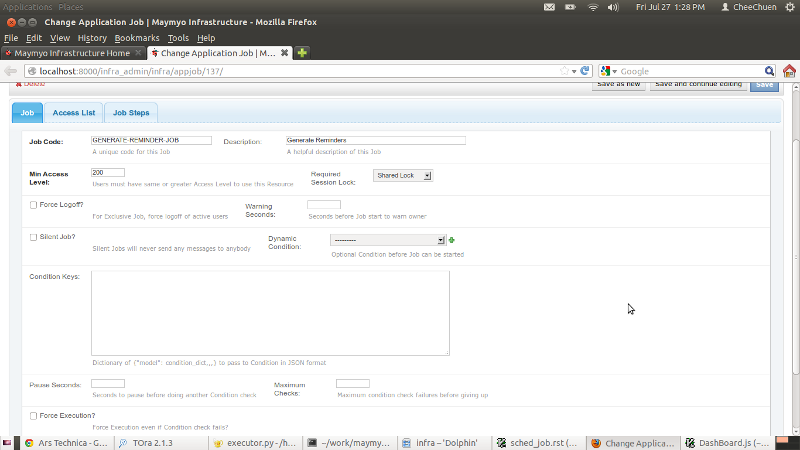
Maintain Application Jobs
An Application Job is a subtype of an Application Resource, so it can use the same Access List control as other Resources.
You must assign a unique code to your Job and give it a helpful description, as it will be used in drop-down lists. The Minimum Access Level and Access List tab controls the access to this Job. Leave the Access List tab alone because we do not use the Key or any of the Job’s Attributes to control access.
If you want to disallow any other Users from scheduling your Job, then goto “Maintain User Profiles” and add this Job to your Access List with Access Key Value of ALL-ROWS. Alternately, you can also allow only your Role to access this Job. In this case, use “Maintain Application Roles” and add this Job to your Role’s Access List.
Exclusive Lock
For a simple Job, you can leave all the other fields alone. Otherwise, a Job with a Required Session Lock of Exclusive Lock can only be performed when no Users are logged in to Maymyo. We call this an Exclusive Job and is used for system closing Jobs when we want exclusive access to the application to perform batch processing or housekeeping tasks.
When an Exclusive Job (that requires an Exclusive Lock when run) is about to start, it will send Alerts to all logged in Users Warning Seconds before its expected Start Time.
You can also Force Logoff for all active Users when your Exclusive Job is going to start. For unattended system closing Jobs, this would be a preferred option because you do not have Operators around to call the Users to logoff.
If your Job does something trivial very frequently, like every 5 minutes, then it will generate a lot of Messages. This can be annoying. You can turn off all messaging from a Job by checking the Silent Job?.
Dynamic Condition checking before Job starts
Sometimes, your Job can only start after somebody has uploaded a certain file that contains market data (that is needed for valuations). In this case, you can use a Dynamic Condition that tests whether the market data for the closing date has been uploaded or not. The Dynamic Condition can be tested multiple times by using the Pause Seconds and Maximum Checks. You can set Maximum Checks to 10 times with a Pause Seconds of 60 seconds between each Check. This gives you a grace period of 10 minutes for the Condition to become True. Checking multiple times can only work in conjunction with the Job Owner. When a Condition test fails, a Message will be sent to the Job Owner (or Rostered User, which will be explained later) who is expected to do something, eg get other Users to log off or perform uploading of a file. Your standard operating procedure may require that this file be uploaded 30 minutes before the Job’s expected Start Time but sometimes this may be overlooked. So using repeated Condition checking allows you to rectify the situation and prevent your Job from being aborted.
If there is no resolution and the Condition is still False after Maximum Checks, then you can force the Job to start by checking the Force Execution flag. You should do this when the omission (that cause the Condition to fail) is fixable after the fact. If not, consider using sms to send the Alerts to the Job Owner or Rostered User.
Passing Model Instances to Dynamic Condition
Sometimes you need to pass in some Model Instances to your Dynamic Condition. Since you cannot program this (the most you can do is pass in the known model instances when executing the Job, eg the Application Job or Job Owner instances), you need to let the Job Owner have a way to pass other Model Instances to the Dynamic Condition. This is where the Condition Keys come in. This is a dict where the key is the app_label.model_name and the value is a nested dict of filter predicates that yields exactly one instance, exactly what QuerySet get() method accepts, eg {‘infra.ValueSet’: {value_set_code: ‘ADDRESS-TYPES’}}. This will pass in a single ValueSet instance in the model_instance parameter to the Dynamic Condition. Of course, you can pass in more model instances by adding other key:value pairs to this dict.
Defining Job Steps
Each Job may have one or more Steps. Each Step in turn can have one or more Tasks, to be executed simultaneously. You will need more than one Step when some Tasks has dependencies on earlier Tasks, for example reporting tasks must wait for batch processing tasks to complete first.
Each Step is identified by its unique (within the Job) Step Number, preferably in increments of 10 so that you can squeeze in a step that you overlooked later. You may also check the Skip? checkbox to temporarily prevent a Step from executing. The order of running of the Steps are by its Step Number, lowest will be run first.
Each Step may have a Dynamic Condition attached to control its execution. An example on how this would be useful is when you have a combined Job that is run daily but has separate Steps that run depending on the type of day it is, eg End of Week, Month or Quarter. You can then maintain one Job rather than separate End of Day, Week, Month and Quarter Jobs (and repeat with different combinations because some days may be a end of Day and Week, while others may be end of Day, Week and Month).
You can use the Condition Keys the same way as described for Application Job. Finally, the Abort Job flag can be used to stop execution of the whole Job when the Condition fails for a particular Step. All subsequent Steps will be ignored.
Adding Tasks to a Step
For each Job Step, you should add at least one Task. Each Task may be an Application Command or Report.
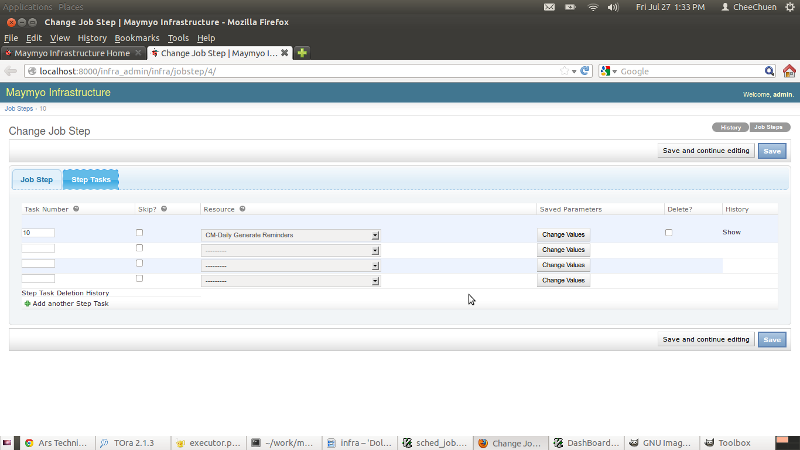
Maintain Step Tasks
Give your task a unique Task Number. This field determines the sequence in submitting the Tasks to the Task Queue. The Skip? checkbox allows you to temporarily omit a Task from being executed. The Resource field is where you select which Command or Report to run. This is mandatory.
Attaching Saved Parameters to a Task
Since a Task in a Scheduled Job will run without human intervention, we need a way to input parameter values (especially date values) to the Task. The Saved Parameters button (that says Change Values) allows you to do this. However, this button is only clickable if the Command or Report has an Application Parameter Set defined.
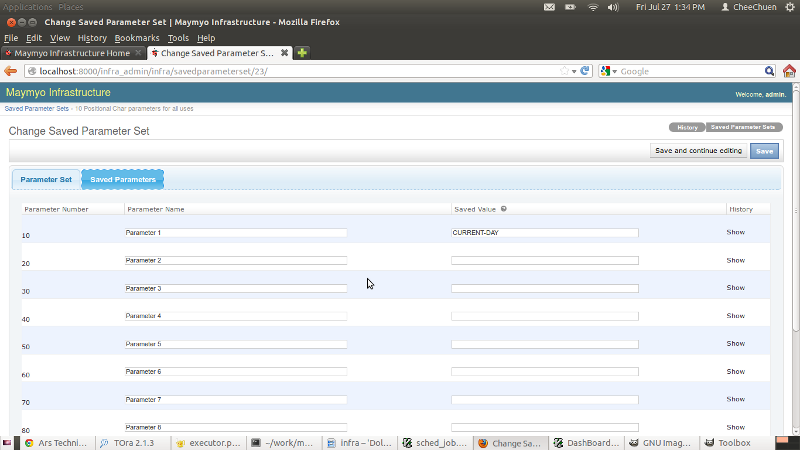
Maintain Saved Parameters
Maymyo will auto-copy all Parameters (of the Parameter Set of the Command or Report) into a set of Saved Parameters. These will be displayed for you to update when you click the Change Values button. The above shows the Generate Daily Reminders Task which can accept up to 10 positional parameters. The first parameter we pass in is a special token CURRENT-DAY. This is a Maymyo Date token that will be replaced with the current date in ISO format, ie YYYY-MM-DD, when the Task is run.
Besides Date Tokens, you can use String or Numeric literals as Saved Parameters. This must match the parameter expected by the Command or Report.
List of Date Tokens
This is the list of Date tokens that you can use for Saved Parameters. They are members of the DATE-TOKENS Value Set. You can add your own Date Tokens to this Value Set.
- BUSINESS-DAY : Return Today if is a Business Day, else previous Business Day. eg if today is Saturday (ie a Rest Day), then will return Friday’s Date. If current time is before the normal Start Business Time (AppRegistry’s START-BUSINESS-TIME defaults to 6am), then revert to previous Business Day too.
- CURRENT-DAY : Return Today regardless of Rest Day, Holiday or Time of day..
- NEXT-BUSINESS-DAY, PREVIOUS-BUSINESS-DAY, NEXT-DAY, PREVIOUS-DAY are variations of the above 2 tokens. You can add more tokens for different plus (NEXT) or minus (PREVIOUS) number of days from current day.
- MONTH-FIRST-BUSINESS-DAY : Return the current month’s first business day.
- MONTH-LAST-BUSINESS-DAY : Return the last business day of current month.
- MONTH-FIRST-DAY : Return first calendar day of the month, ie the 1st.
- MONTH-LAST-DAY : Return last calendar day of the month, ie the 30th, 31st or 28th (or 29th) for February.
- YEAR-XXXXXX-DAY : Similar to MONTH-XXXXXX-DAY.
- QUARTER-FIRST-DAY: Return the first calendar day of current quarter, eg 1st April.
- QUARTER-LAST-DAY: Return the last calendar day of current quarter, eg 30th June.
Scheduling your Application Job
After you have defined the Tasks for your Job, you can schedule it for execution.
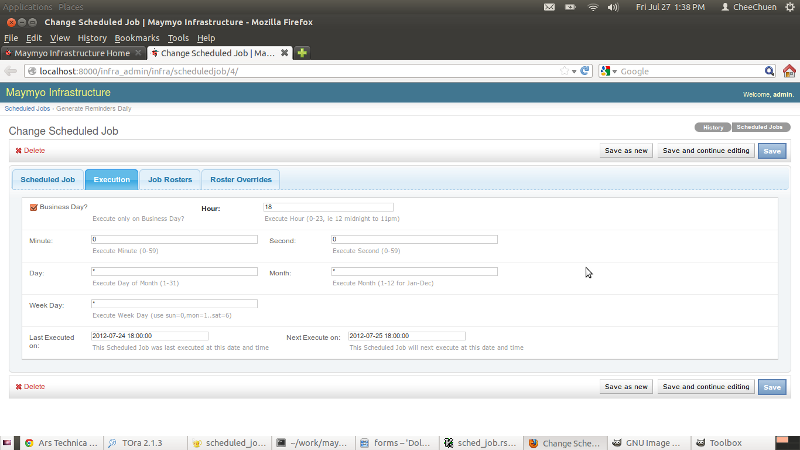
Maintain Scheduled Jobs
Give your Scheduled Job a helpful description and select the Application Job you have defined earlier. The Job Owner will default to you, ie whoever added this Scheduled Job.
If your Job executes only on a business day, then you may want to choose a Calendar to use. Otherwise it will use the Application default. Clicking Skip? will allow you to temporarily skip the execution of this Scheduled Job.
The Effective From date controls when the Scheduler will start considering this Scheduled Job for execution. If left blank, then it will never be executed. If you enter an earlier date for a non-repeated job, then it will also never be executed. This is because the Scheduler works in the current day and time, no back-dating.
The Expire On date tells the Scheduler when to stop executing this Job. Use this only for Repeat? jobs. When you check the Repeat? checkbox, then the Scheduler will consider the Job for execution from Effective to Expiry dates. When Expire On is left blank, then it will execute forever.
Defining the Execution Time of your Job
This is in the Execution tab as shown above. At the very minimum, you must specify the Hour when your job is to be executed. For non-repeated jobs, you should enter a time in the future, otherwise your job will never be executed. The following are the time fields that you can enter :-
- Business Day? : When checked, the job will only be executed during business days, using the Calendar of the Scheduled Job or Application default.
- Hour : Mandatory field, you must define at the very least which hour you want to run your job. This field uses the 24 hour format, ie 0 to 23 where 0 means 12 midnight.
- Minute : 0 to 59, defaults to 0 when blank.
- Second : 0 to 59, defaults to 0 when blank.
- Day : 1 to 31, ie the day of the month. You can also use Date Tokens, eg CURRENT-DAY. When token used, then the Month and Week Day fields are ignored. Defaults to the * wildcard, ie every day of the month.
- Month : 1 to 12 for Jan to Dec. Defaults to the * wildcard, ie every month of the year.
- Week Day : Day of Week, Sunday starts as 0, Monday is 1 and Saturday is 6. Defaults to the * wildcard, ie every day of the week.
List, Range and Skip values
For all the time fields above, you can also use List and Range (with optional Skip values).
- List : a comma separated list of values, eg if you want to execute a job at 6am, 8am and 1pm, then enter “6,8,13” in the Hour field.
- Range : a range of 2 numbers (with a - in the middle), eg “6-12” for the Day field means you want to execute on the 6th, 7th, 8th, 9th, 10th, 11th and 12th of the Month.
- Range with Skip: a range of 2 numbers using the Skip value to increment, eg “6-12/2” in the Day field means 6th, 8th, 10th and 12th of the Month.
Day of Month semantics
The Day, Week Day and Business Day fields are considered together. If any one does not agree with the other(s), then the Scheduler will move on to the next computed day.
For example, Day may be “1-7” and Week Day is “1” means execute only on the Monday that falls between the 1st and 7th of the Month, ie the first Monday. And if Business Day? is also checked, then it will execute only when the first Monday is a business day. If you want the First Business Day of the month, you can use the Date Token MONTH-FIRST-BUSINESS-DAY.
Job Rosters
If your Job is an unattended closing that performs mission-critical batch processing and reporting, then you will want to create a Roster of users who will standby (with mobile phones or email client) to receive Alerts when something goes wrong. At the very least, this user is responsible for checking that the job completed normally.
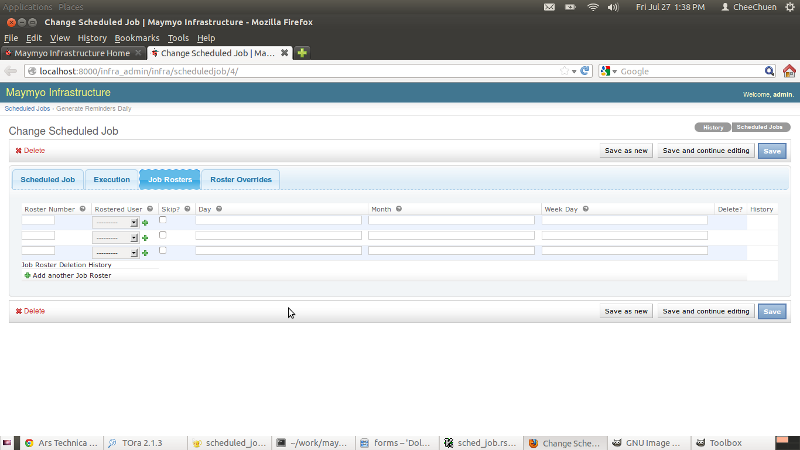
Maintain Job Rosters
The Roster works on a daily, monthly and day of week combinations. You specify the Roster Number sequence of a Rostered User which will be used as the order of evaluation (in case many users are rostered on the same day, then the first one found is returned).
You enter the Day, Month and Week Day the same way are above.
If you want to have a weekly roster, where UserA is rostered on Monday, Wednesday and Friday and UserB on Tuesday and Thursdays (the job runs on business days only), then use :-
| User | Day | Month | Week Day |
|---|---|---|---|
| UserA | blank | blank | 1,3,5 |
| UserB | blank | blank | 2,4 |
If you want to make it fairer, then swap them forthnightly :-
| User | Day | Month | Week Day |
|---|---|---|---|
| UserA | 1-14 | blank | 1,3,5 |
| UserA | 15-31 | blank | 2,4 |
| UserB | 1-14 | blank | 2,4 |
| UserB | 15-31 | blank | 1,3,5 |
blank means leave the field blank.
If there are holes in your roster, ie no rostered user found for a specific day, then we will use the Job Owner (of the Scheduled Job, not the Application Job) as the rostered user.
Roster Overrides
If for a specific day, UserA is on leave, then you can use the Roster Override.
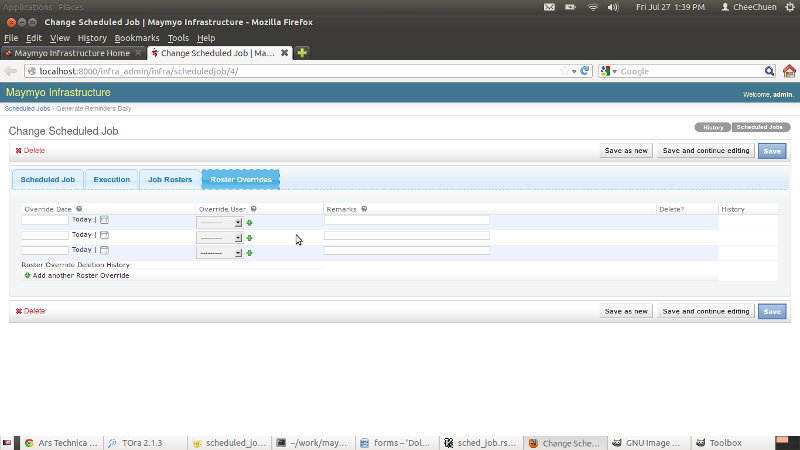
Maintain Roster Overrides
Just enter the Override Date and select the Override User. The Remarks can be used to record the reason for the override.